What adhesive do you use for rubber baseboard?
What adhesive do you use for rubber baseboard?
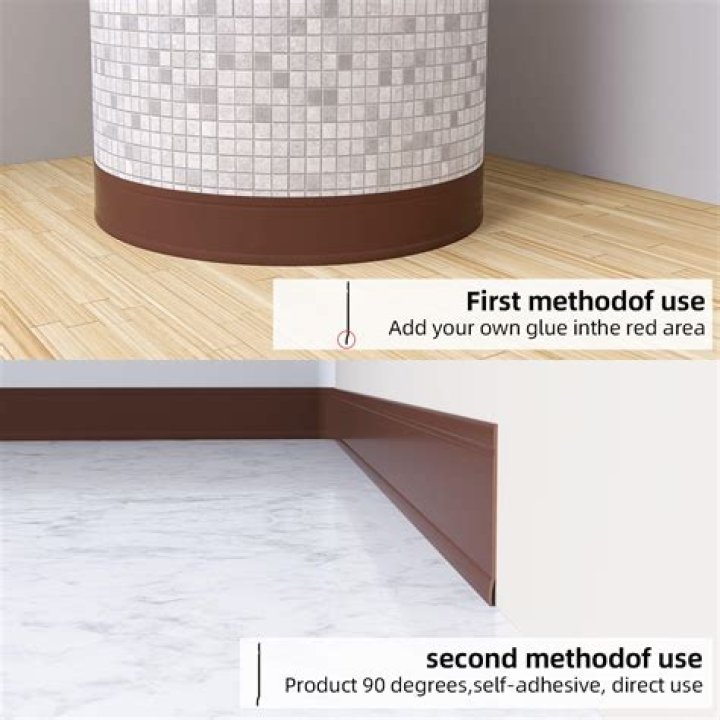
Since rubber baseboard is also referred to as cove base, you may have to look for cove base adhesive. It comes in a caulk tube and needs to be put in the caulk gun in order to apply it. Squeeze the caulk gun to apply some adhesive to the back of the rubber baseboard.
What is the difference between rubber and vinyl cove base?
Cove Base is usually made from either rubber or vinyl. Rubber cove base is the preferred product, as it doesn’t shrink and is more scuff resistant. Cove base can be made in seamless rolls of 120LF or in lengths, usually 4′ long. Some new types of cove base are made in either 6′ or 8′ lengths depending on the producer.
How much does it cost to install cove base?
The cost of metal cove base generally ranges between $4.00 per foot and over $15.00 a foot for a good quality metal cove base. Metal cove base installation methods are similar to vinyl cove base, by using either a double-sided installation tape or a cartridge adhesive.
How long does wall base adhesive take to dry?
Rolled or warped cove base should be laid flat for 24 hours and allowed to return to normal state before adhesive application.
How much does it cost to install vinyl cove base?
Pricing for a vinyl cove base can range from under $1.00 per foot to around $2.50 per foot. The costs usually depends on the quality of the product, the quantity purchased, the manufacturer, and sometimes the color you choose (if custom colors are available).
What is the best adhesive to bond rubber to rubber?
Cyanoacrylate adhesive
Cyanoacrylate adhesive, commonly known as super glue, is generally the best adhesive for rubber bonding. You only need a very small amount and the bond becomes very strong and rigid almost instantly. If the joint falls apart after curing, it may be due to the type of rubber you are using.
Is rubber wall base waterproof?
Benefits. Rubber molding is waterproof, making it resistant to rot and fungus growth. Unlike wood molding, it is also impervious to dents, scratches, scuff marks and stains.
What’s the difference between vinyl and rubber?
Vinyl does not have the same steadfast durability as rubber, and it may crack or curl if abused for prolonged periods of time. Vinyl is not as easily cleaned as rubber, however. Vinyl mats are highly resistant to chemical absorption and may be produced in a greater variety of color options than rubber mats.
How do you make a rubber wall base?
Apply adhesive to the backing, and bend the base around the corner while pressing it firmly against the wall. Soften the rubber base with a hair dryer when forming an inside corner. Draw a line on the back where the base meets the corner, remove about 20 percent of the rubber backing with a gouging knife and glue it down.
How do you get rubber cove moulding to bend?
Find the corner, score it, and remove about 1/4 of the material at the corner on the back side (to allow for the base to bend inward). You can use a hair dryer to heat the moulding up so it will bend around the corner. Alternatively, you can purchase corners to match the moulding itself.
What’s the best way to install baseboard molding?
Place the new section into the corner with the coves overlapping. Mark a line on the new piece where the coves overlap. Place the new piece flat on the plywood with the cove upright. Cut through the top edge of the cove up to the cut line. Cut through the short face of the cove and remove the scrap piece.
How do you notch a rubber Cove base?
For inside corners, you score the back and notch out the base as shown below: We didn’t have any outside corners to do, but they are pretty easy to do. Find the corner, score it, and remove about 1/4 of the material at the corner on the back side (to allow for the base to bend inward).
Apply adhesive to the backing, and bend the base around the corner while pressing it firmly against the wall. Soften the rubber base with a hair dryer when forming an inside corner. Draw a line on the back where the base meets the corner, remove about 20 percent of the rubber backing with a gouging knife and glue it down.
Find the corner, score it, and remove about 1/4 of the material at the corner on the back side (to allow for the base to bend inward). You can use a hair dryer to heat the moulding up so it will bend around the corner. Alternatively, you can purchase corners to match the moulding itself.
Place the new section into the corner with the coves overlapping. Mark a line on the new piece where the coves overlap. Place the new piece flat on the plywood with the cove upright. Cut through the top edge of the cove up to the cut line. Cut through the short face of the cove and remove the scrap piece.
For inside corners, you score the back and notch out the base as shown below: We didn’t have any outside corners to do, but they are pretty easy to do. Find the corner, score it, and remove about 1/4 of the material at the corner on the back side (to allow for the base to bend inward).